
DIY Activity: Whimsical Toadstool Bird Feeders
- Natalia

- Jan 26
- 4 min read
Following from our pinecone feeder adventure, here’s another creative, nature-connected project: toadstool-style bird feeders made from dried fruit halves and seed-fat mix.
It’s playful, productive, and perfect for toddlers and pre-schoolers, especially on chilly days when outdoor exploration becomes a treasured break from indoor monotony. It’s about engaging curiosity, sense of purpose, and some messy fun that ends with feathered visitors at the window.

🖌️ What you’ll need
Fruit halves, grapefruit, oranges, or pomegranate wok for the “caps”
Twigs or thin branches
Toothpicks or kebab skewers (optional perch)
Lard or other solid fat
Bird seed mix
String
Drill or awl to make holes
An egg tray (trust me: it’s a game-changer for toddler success)
How to make the bird feeder:
Day One
With toddlers it's nice to split this into two sittings, that way enthusiasm stays high and chaos levels remain acceptably low.


1. Prep the Fruit “Caps”
Slice your chosen fruit in half. Eat the juicy bits, then scrape out any flesh. Place the empty fruit cups somewhere warm to dry out, a radiator or in front of the fire works well.
2. Go Twig Foraging
This can be a lovely little stick hunt in the garden or on a walk, matching sturdy twigs to the size of your fruit caps. We, however, were facing -16°C temperatures and roughly five inches of snow, so we raided the kindling box instead.
3. Drill the Twigs
Carefully make two holes in each twig:
One near the top for the hanging string
One in the middle for a toothpick “perch” (Cute in theory, though after observing the birds, I can confirm the perch was mostly for our benefit. The birds seemed perfectly happy perching directly on the rim.)
Trim and insert toothpicks so they poke out like tiny benches for bird feet.
Then it’s time for a break, and a well-deserved snack.
Day two
4. Mix the Seed Feed For a simple winter fat-ball mixture, the best ratio is one part fat to two parts dry mixture.
Warm your fat gently on a low heat, then stir in plenty of birdseed until everything is well coated. The aim is a sticky, mouldable mixture rather than a runny one. Leave it to cool slightly so it’s safe to handle.
If you have older children, they can help with the stirring stage. Our toddler was safely redirected until the mixture cooled, for self-preservation and kitchen sanity, mainly.
If you have more time (or children with more patience than mine), you can make your own bespoke recipe. Gardeners’ World has a nice guide to follow below.

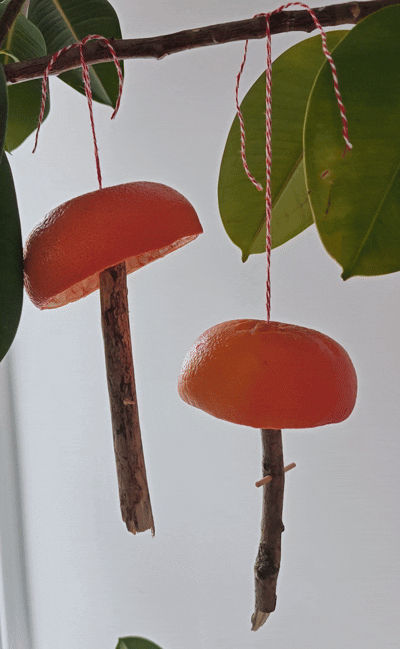
5. Assemble for Success
Thread the twigs and then push the thread through holes you’ve made in the dry fruit caps. (Like the pinecones, I hung them up temporarily on our houseplant to keep them safe from little hands)
Here’s where the parenting hack enters the picture: rather than trying to hold the caps while you fill them, attach the assembled caps to an egg tray. Simply poke a hole in the tray, thread the string through, and tie off with a cocktail stick underneath to secure it.
This stops the fruit wobbling and gives your toddler a workstation, it also catches any fat that might drip through the hole at the top.


This was the difference between this activity being a stressful mess and being enjoyable for all involved:
✔ no rolling wet fruit
✔ no dripping seed fat across the table
✔ many extra “cups” in the tray for filling (vital for maintaining toddler morale)
6. Filling Fun Time! Now the best bit: let your toddler fill each cap with the seed mix. Pat it down firmly so it sticks well, they can help pat or just spoon in, depending on their skill level. The extra egg tray cups mean there’s more to fill, just in case your toddler wants to fill more than just the fruit caps.
Once they’re packed, pop everything outside in the cold to firm up — nature’s own fridge.


7. Hang Them Up
After a few minutes outdoors, hang your toadstool feeders in a favourite bird-watching spot. If it’s familiar territory, birds will likely find them quickly; in new spots, it may take a little while.
8. Optional Magical Touch
If you have white chalk lying around, draw spots on the fruit caps to make them truly look like fairy-tale toadstools. We couldn't find white and tried pink chalk but it doesn't really have the same effect! 😄
Final thoughts
⭐ A solid 9/10 from us (only minus a star because of the preparation faff)
My son was fully invested from start to finish
Breaking it into two days kept things easy for everyone involved
Adds whimsy to your garden landscape
And toddlers can take the lead without frustration
There’s something so satisfying about a craft that has a purpose beyond looking pretty. Watching the feeders go out and then seeing birds investigate later adds that extra spark of wonder and makes children feel their efforts mattered.
If you try your own toadstool feeders, do let us know how it went and who visited! Share yours in the comments or tag us on Instagram @Ladybird_family — we love seeing tiny hands helping wildlife.
You can also sign up to our newsletter for more gentle, seasonal activities for curious little nature lovers.


Comments